67' Flareside "Old Grey"
Moderator: FORDification
-
Fathersalt
- New Member

- Posts: 37
- Joined: Sun Apr 11, 2010 9:51 pm
- Location: Lubbock, TX
67' Flareside "Old Grey"
Some pics of my progress...
You do not have the required permissions to view the files attached to this post.
-
Fathersalt
- New Member
- Posts: 37
- Joined: Sun Apr 11, 2010 9:51 pm
- Location: Lubbock, TX
Re: 67' Flareside "Old Grey"
You do not have the required permissions to view the files attached to this post.
-
Fathersalt
- New Member
- Posts: 37
- Joined: Sun Apr 11, 2010 9:51 pm
- Location: Lubbock, TX
Re: 67' Flareside "Old Grey"
Im shocked Ive made it this far, Im such a newb! Cant wait to see this chassis in POR 15!
I think my next step is to rebuild all the brakes, pull the steering wheel and get the cab off and get this puppy to the sandblaster!
I hope Im doing this in the right order, I really want to do it right and have something I can be proud of in the end. Without you guys and these forums I would stand little chance, yall have forgotten more about this stuff than I know. BTW as i have stripped this thing out I cut all the wires and harnesses to pieces. Thats what scares me tho most is whether or not I can get it all wired back up. Time will tell. Yall have a good n'.
The green 69' btw has a straight 6 cyl in it, should be a perfect rig for a first vehicle for Wyatt.
You do not have the required permissions to view the files attached to this post.
-
guerra

- Blue Oval Fan

- Posts: 700
- Joined: Wed Mar 10, 2010 4:29 pm
- Location: West Texas
Re: 67' Flareside "Old Grey"
Good progress.. your moving quick 
1967 f-100 lwb 360/c6
1969 f-100 swb 351/c6 (project)
1969 f-100 swb 351/c6 (project)
-
BiggDogg
- Blue Oval Fanatic

- Posts: 996
- Joined: Thu Mar 22, 2007 1:33 pm
- Location: California, Inland Empire
Re: 67' Flareside "Old Grey"
Moving right along, looking good
1970 F250 Camper Special
"Its no coincidence that man's best friend can't talk."
"Its no coincidence that man's best friend can't talk."
-
waynaferd
- New Member
- Posts: 122
- Joined: Fri Sep 22, 2006 8:43 pm
- Location: Stinkin Lincoln Maine!
Re: 67' Flareside "Old Grey"
I like the first pic...no need to be bashful, bale right on in there!!
My little boy is 4 and I'm hoping by the time he gets his license my Bump is driveable
My little boy is 4 and I'm hoping by the time he gets his license my Bump is driveable
A 72 F-250 Hi-Boy "project" ( that means sitting untouched for 3 or so years)
And a little 94 F-150 Flareside, 7" higher and 35's...
And a little 94 F-150 Flareside, 7" higher and 35's...
-
Fathersalt
- New Member
- Posts: 37
- Joined: Sun Apr 11, 2010 9:51 pm
- Location: Lubbock, TX
Re: 67' Flareside "Old Grey"
Welp, Ive been moving along some here and there. Did some prep on the frame getting rdy to apply some por15. Initially I was going to just pull the body all off the frame and roll the whole thing down to the sandblasters and tell him to get after it. But Im worried I wont be able to get it painted quik enough before it starts to rust all over again. Plus my truck fund took a big hit. So the plan for now is to do as much as I can on my own and have him blast select areas like in the corners that are a serious PIA to get cleaned up. I really wanted to rebuild my rear brakes before any of this and strip and por15 the axle/springs and brakes first. Which reminds me!!! I saw in a thread where somone replaced the spring bushing with polyurathane bushings and re-used the metal sleeve. He used what looked like just a long bolt with few washers of different sizes and nuts on the end and it pulled the rubber out first and then the sleeve. If you know where that post is please gimme a link, I cant find it for the life of me. Also, where can we get those poly bushings for our springs?
I keep telling myself today is the day I will put por15 on that part of the frame I have prepped, but I dono if I have time to go from marine clean to metal prep to por to topcoat in one afternoon in 4-5 hours.
I got the steering wheel and gas tank out yesterday and a few other nick nacks, I am going after the saginauw<---sp? next. After reading all the threads on folks asking for help getting the pitman arm loose, Im scared, but Im goin for it. Wish me luck.
Anyhow, Im rambling...cyall later.
Thnx guerra and biggdogg, I am a tree care guy by trade so every nut and bolt I turn on this thing is a learning experience.
Wayne I know what ya mean, my goal is a 5 year resto, if I can hit that goal I plan on taking my son down around Brownfield, TX and teaching him how to drive on the same backroads I learned on. Hmm, mayb I should just seal it off after the body work is done and paint it after a few of those trips. I remember getting off into my fair share of barditches when I was learning.
You do not have the required permissions to view the files attached to this post.
-
guerra
- Blue Oval Fan
- Posts: 700
- Joined: Wed Mar 10, 2010 4:29 pm
- Location: West Texas
Re: 67' Flareside "Old Grey"
Brownfield, Tx thats cool. i still got family there. i was born in Lamesa. parents have house in Patricia. i went to school at
Klondike. we ride to Lubbock sometimes to go eat at Joes crab shack since Midland dont have one.
Klondike. we ride to Lubbock sometimes to go eat at Joes crab shack since Midland dont have one.
1967 f-100 lwb 360/c6
1969 f-100 swb 351/c6 (project)
1969 f-100 swb 351/c6 (project)
-
Caseys71

- Blue Oval Guru

- Posts: 1289
- Joined: Sat Nov 07, 2009 7:48 pm
- Location: Hampstead, North Carolina
Re: 67' Flareside "Old Grey"
Old Grey is looking good and you seem to be chugging right along! Your son is going to be one lucky kid when he gets the keys to your truck ! As for the bushing removal method you were talking about it was 72stepside's project thread that you saw that in, I only know that because I bookmarked it too here's the link: http://www.fordification.com/forum/view ... a&start=60. As for the polyurethane bushings you can order Energy Suspension bushings at AutoZone at least that is what i plan to do, I believe the bushings are somewhere in the neighborhood of $40-50. Here's a link for you :http://www.autozone.com/autozone/catalo ... g+Bushings Good luck with the rest of your build!
Casey
16 years old with a 40 year old truck (well almost)
1971 F-100302, T-18 4 speed, 3:55 rear, & an Edelbrock sticker on the ashtray.
"Don't worry about what you become, just make sure that you're successful at what you do."- Mr. English
"Value what you DO have over that which you don't."- Forrestbump
"Wanting can sometimes be better than having, never stop dreaming... it's what keeps us all going."- Forrestbump
1984 Toyota 4x4: 22-R, 5-speed, 3" suspension lift, 35's and 5:29's
-
Fathersalt
- New Member
- Posts: 37
- Joined: Sun Apr 11, 2010 9:51 pm
- Location: Lubbock, TX
Re: 67' Flareside "Old Grey"
Thanks Casey!!!! I owe ya one!
-
Fathersalt
- New Member
- Posts: 37
- Joined: Sun Apr 11, 2010 9:51 pm
- Location: Lubbock, TX
Re: 67' Flareside "Old Grey"
Hey guerra, cool, we still have alot of family in brownfield also.
Well I have been working on the truck when time permits, Im just way behind on posting my progress. Lets see, where were we? I got more of the frame prepped. I did it all with a small angle grinder with a wire wheel on it. If I had the money I would so recommend sand blasting over a wire wheel but its doing a good job
We ended up back in Muleshoe one weekend back in early June so we loaded the engine up for me to bring it back home. Did I mention everything is bigger in TX including our engine dollies.
Polished off the afternoon with some good home cooking.
You do not have the required permissions to view the files attached to this post.
-
Fathersalt
- New Member
- Posts: 37
- Joined: Sun Apr 11, 2010 9:51 pm
- Location: Lubbock, TX
Re: 67' Flareside "Old Grey"
Ive been slowly stripping all the parts, knobs, bells and whistles out of the cab, and got that removed. I was really excited about this step, it marked a spot on my mental progress chart and I am soo glad to have gotten to this point and acheived the lift without any damage. My buddy Anthony helped a bunch that afternoon.
 I painted the prepped portion of the frame with POR15. I used the Silver P15 so that I could readily discern where I have good topcoat coverage with the glossy black topcoat. I kind of stumbled onto this paint scheme out of lazyness really. The "outside" portion of the frame I will topcoat leaving the "interior" and crossmembers with just a coat of the silver por15. I cant say how impressed I am with the POR15 products. I did it all with a paintbrush and it all smooths out really well as it dries as long as you dont go too thick and dont go back after more than 30-45 seconds and try to "fix" a poor brushstroke. I will say I think when I did some of the topcoat it was too hot and more importantly too humid to be painting. By the time I painted and went back into the cup to get more paint on my brush, what I just painted had already "set". On the can it says a range of something like 50-80 degrees. It was all of 120 in the shop that day. LMAO, reminds me, when I took my rubber gloves off that day, I think I poured a cup of sweat out of them. Gotta love TX summer.
July 3rd, I got the whole back end removed and ready to restore. I did end up having to cut that little star adjusting assembly with a torch and the drums came right off no problem after that. Then, I removed the 4 bolts that hold the backing plate to the axle and the axled to the rearend removed. I slid the axles out and then slipped the back plates off of the axle and replaced the axles so I could move the rearend around and do whatever and not contend with spilling axle goop all over the place until I was ready for that portion of it. I hung it up off a pulley so I could work with it at about eye level and so I could cant it either way to prevent axle juice from pouring out when the axles came out.
Popped off the leaf packs, and broke down each brake assembly. I have the parts ordered mainly from NPD for full rebuild and picked up a few different colors of paint and the shoes today at Autozone. Shoes are Duramax I believe. Made in Mexico. I figured they have to be better than chinese made parts so I didnt fuss about buying em.
I ordered the shop manual on CD-ROM from NPD also. Hope its got lots of cool info.
I intend to work on the brake prep more tomorrow but probably wont get much done. My son will be with me and the wire wheel kicks up alot of rust dust off those nasty brake parts. He doesnt need to be breathing that, and I challenge you to get him to wear a mask.
Have a good weekend guys.
You do not have the required permissions to view the files attached to this post.
-
Fathersalt
- New Member
- Posts: 37
- Joined: Sun Apr 11, 2010 9:51 pm
- Location: Lubbock, TX
Re: 67' Flareside "Old Grey"
Think these brakes need some cleaning? 
You do not have the required permissions to view the files attached to this post.
-
papabug71

- 100% FORDified!

- Posts: 2002
- Joined: Mon Oct 13, 2008 11:31 pm
- Location: McAlester, Oklahoma
Re: 67' Flareside "Old Grey"
Dang man. 5 years? If you keep going at this rate you'll have it done in a couple of months
It's comming along nicely. I envy your loaders, as they make the heavy lifting 10x easier.
Im a fan of POR15 as well. It has always worked wonderfully for me in the past. Thank God you wore gloves, im still wearing some POR from a couple of years ago
Also, do I spy an old Studebaker in the background ??
Matt
1971 F-100 Sport Custom - My grandpaws truck
Been in the family since 10/3/'71 (Brand spankin' new)
Mine since 5/7/'94
302 / 3 speed / 3:25's
--Currently undergoing full frame off resto/mod--
-
Fathersalt
- New Member
- Posts: 37
- Joined: Sun Apr 11, 2010 9:51 pm
- Location: Lubbock, TX
Re: 67' Flareside "Old Grey"
Hey papa! Well I am moving along pretty good I guess, but I have a really small budget for doing this. $80 a month is what Im setting aside for it. Im back to zero after buying all the parts for the brakes. Once the engine and drivetrain start, mmm, I dono really how im gonna do it. Ya, all the heavy equipment is sweet isnt it. Access to that stuff has made some things go so smooth. I dont own any of it or the shop. It is where I work and the boss has been very cool about letting me do this. 85% of the equipment I use is his except wrenches and stuff. He even cleared a spot in the shop where the chassis rests now for me to work. Last Monday he said to me "Colby, you have inspired me to restore the 59' el camino out back." Its funny cause he is about 100x more mechanically inclined than I am and he restored many vehicles during his younger years. The other guys at the shop are bustin my balls cause they say once he gets started on his Im done for. He will have his back to origional condition and I will be trying to paint my engine. Ya, he has the 59 el camino, the studabaker and a 40's dodge I believe out back sitting in the weeds.
The gloves are really helpful when using por15. On one especially hot day I was painting and changed positions where the cuffs of the gloves went down. ALOT of sweat poured out onto the freshly painted surface. I was sooo . Cause I remember reading somewhere in the por info, if even one drop of sweat drops into uncured product it is ruined and must be removed and start over. I havent worn the gloves since. I didnt remove the paint and start over, it seems fine. I think it would be difficult to remove with anything short of a sandblaster anyway.
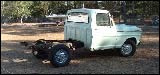
Ahh I wanted to show you guys a truck I ran across on some anywhere in USA street. The guy happened to be outside and opened it for me. I forgot what year it is but its SWEET. I didnt say anything to him but I noticed in alot of spots where rust is starting to "bruise" and "bleed" through the body work he did. He said he used all bondo work and I think he will ultimately pay the price on this beautiful rig for not doing all his prep work right the first time. I dont know if its justification but this is one reason I am intent on getting with someone that does lead body work and learning from them. I say do it right the first time. I really want my truck to last another 50 yrs as a daily driver. I may be wrong about wanting to learn lead but I get the feeling alot of the cream of the crop bodywork guys use lead for a reason. Bondo certainly has its place. I may be talking out of my (.), time will tell.
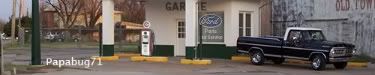
This really cool restored cab pulled up beside me yesterday at a stop light. How cool is that!!!
I just keep telling myself, I can do this, dont look at it as a whole project or I get overwhelmed. Just focus on the immediate task at hand. The mindset has kept me in the game so far.
I didnt say anything to him but I noticed in alot of spots where rust is starting to "bruise" and "bleed" through the body work he did. He said he used all bondo work and I think he will ultimately pay the price on this beautiful rig for not doing all his prep work right the first time. I dont know if its justification but this is one reason I am intent on getting with someone that does lead body work and learning from them. I say do it right the first time. I really want my truck to last another 50 yrs as a daily driver. I may be wrong about wanting to learn lead but I get the feeling alot of the cream of the crop bodywork guys use lead for a reason. Bondo certainly has its place. I may be talking out of my (.), time will tell.
This really cool restored cab pulled up beside me yesterday at a stop light. How cool is that!!!
I just keep telling myself, I can do this, dont look at it as a whole project or I get overwhelmed. Just focus on the immediate task at hand. The mindset has kept me in the game so far. 

The gloves are really helpful when using por15. On one especially hot day I was painting and changed positions where the cuffs of the gloves went down. ALOT of sweat poured out onto the freshly painted surface. I was sooo
Ahh I wanted to show you guys a truck I ran across on some anywhere in USA street. The guy happened to be outside and opened it for me. I forgot what year it is but its SWEET.
You do not have the required permissions to view the files attached to this post.