'71 F-250 Diesel conversion and more 01/10 starting back in
Moderator: FORDification
-
layedout72
- Blue Oval Guru

- Posts: 1280
- Joined: Fri Apr 21, 2006 5:11 pm
- Location: Mississippi, Hattiesburg
-
Ranchero50

- Moderator

- Posts: 5799
- Joined: Wed Nov 08, 2006 7:02 pm
- Location: Maryland, Hagerstown
- Contact:
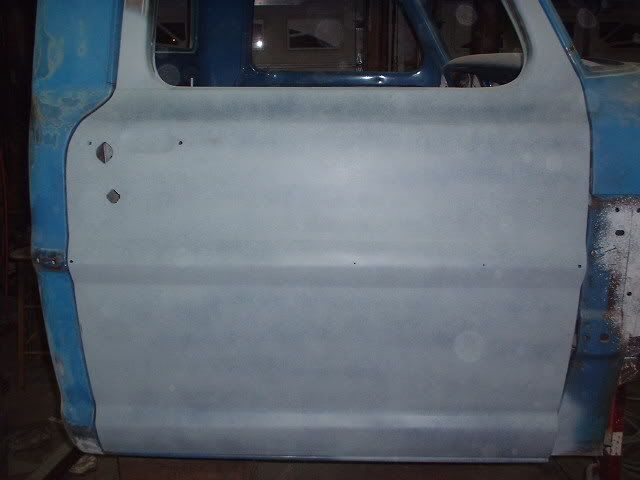
It sounds worse than it is... The whole friggin garage is bondo creme colored now. I'll take some pics to prove it. I may end up with 1/16 - 3/32" on the door skin where it's buggered. The thing didn't look very bad when I started, but it seems I keep putting it on and sanding it off only to realise it's still low in the low spots. It really looks good when it's sanded off, but then I have to add some more to the low spots and we start all over again.
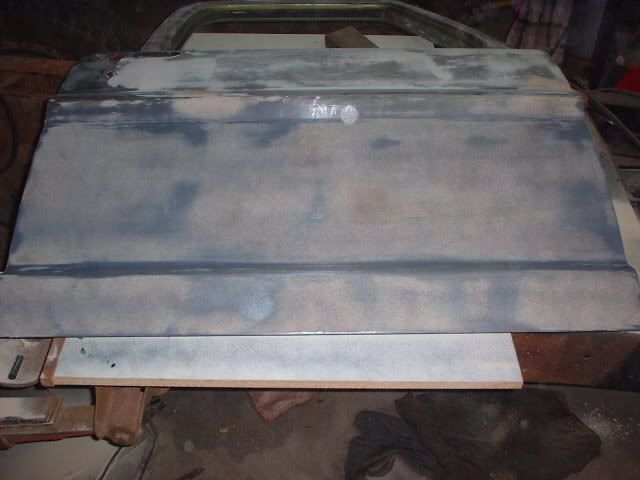
The first two pics showed how smooth it got using the 4 x 10'" pad with a glide coat, but it just didn't feel smooth to the fingertips so I made a longboard and started over again.
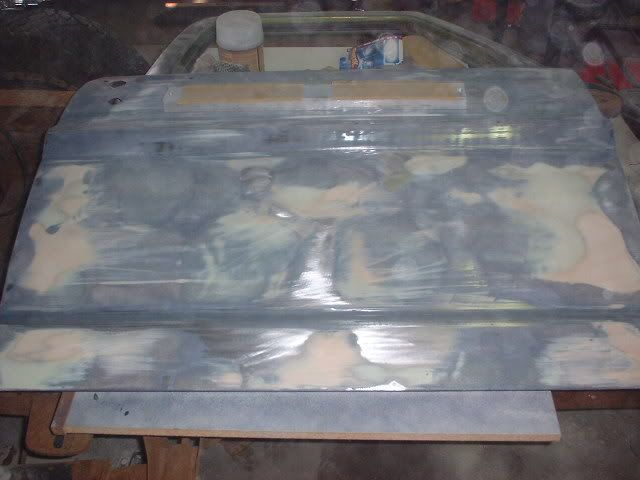
Bare spots are high, creme bondo is flat and the blue glide coat shows low. The aluminum bar on the upper door is being used to block it and has two peices of 60 grit spray adhesived to the bottom and 100 grit to the top and it's working really well. Tonight my neighbor took pity on my aching muscles and brought home an air file and some 80 grit paper. These were from a couple days ago, the bare and blue spots are much smaller and I'm starting on the upper panel which is much flatter. Remember, this door had fourteen holes in the panel from mirrors being mounted and I had to weld up another three moulding holes along the bottom flat and two rust holes in the corners. I figure it must have also had some waves I didn't notice at first. I figure if I can get this flat and workable I can finally finish restoring my '69 fastback mustang...
Jamie
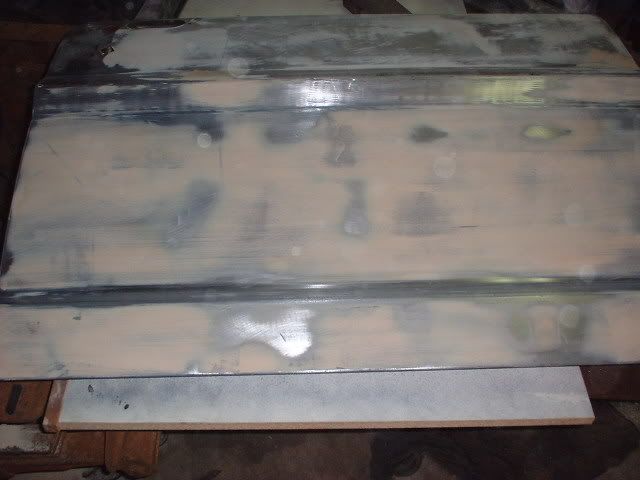
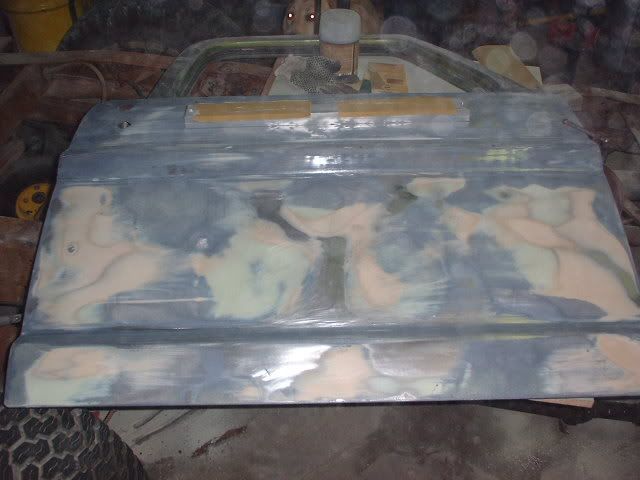
The first two pics showed how smooth it got using the 4 x 10'" pad with a glide coat, but it just didn't feel smooth to the fingertips so I made a longboard and started over again.
Bare spots are high, creme bondo is flat and the blue glide coat shows low. The aluminum bar on the upper door is being used to block it and has two peices of 60 grit spray adhesived to the bottom and 100 grit to the top and it's working really well. Tonight my neighbor took pity on my aching muscles and brought home an air file and some 80 grit paper. These were from a couple days ago, the bare and blue spots are much smaller and I'm starting on the upper panel which is much flatter. Remember, this door had fourteen holes in the panel from mirrors being mounted and I had to weld up another three moulding holes along the bottom flat and two rust holes in the corners. I figure it must have also had some waves I didn't notice at first. I figure if I can get this flat and workable I can finally finish restoring my '69 fastback mustang...
Jamie
'70 F-350 CS Cummins 6BT 10klb truck 64k mile Bahama Blue
Contact me for CNC Dome Lamp Bezels and Ash Tray pulls.
Contact me for CNC Dome Lamp Bezels and Ash Tray pulls.
-
HRDROKN

- Preferred User

- Posts: 384
- Joined: Mon Jul 09, 2007 3:39 pm
- Location: California, Vacaville
re: '71 F-250 Diesel conversion and more
Damn Jamie.... thats a lot of work bro! Looks like you are doing a great job!!! I hope you are taking plenty of beer breaks to replenish your fluids 

'69 Ford Cummins Crew Cab... Built 6BT main & head studs, ported & oringed head, springs, Ti retainers, marine cam, tweaked P7100, 4K gov kit, NV4500 w/1.375" input, Southbend 3600# DD clutch, NP271 w/SYE, D60 HP front, high steer, 16" coilovers & 4-link, D80 w/disc rear, 4.10's & LSD, spinning 38" x 14.fiddy's on classic slots..... more coming!
http://www.fordification.com/forum/view ... hp?t=23267
http://www.fordification.com/forum/view ... hp?t=23267
-
Ranchero50
- Moderator
- Posts: 5799
- Joined: Wed Nov 08, 2006 7:02 pm
- Location: Maryland, Hagerstown
- Contact:
No beer, but my tits hurt from pushing that darn board accross the panel... I'm doing this after putting in a twelve hour day at work. Remarkably I don't have any problem falling asleep at night.
Jamie
Jamie
'70 F-350 CS Cummins 6BT 10klb truck 64k mile Bahama Blue
Contact me for CNC Dome Lamp Bezels and Ash Tray pulls.
Contact me for CNC Dome Lamp Bezels and Ash Tray pulls.
-
FLATBEDFORD

- 100% FORDified!

- Posts: 1818
- Joined: Sat Feb 18, 2006 1:34 pm
- Location: New York, Crugers
- Contact:
I wonder what your lungs look like.
Steve
1970 F350 DRW Factory 9' Platform/Stake, 360, T18.
Passed on to new care taker July, 2013
My Photo Gallery
http://s115.photobucket.com/albums/n298/flatbedford/
1970 F350 DRW Factory 9' Platform/Stake, 360, T18.
Passed on to new care taker July, 2013
My Photo Gallery
http://s115.photobucket.com/albums/n298/flatbedford/
-
Ranchero50
- Moderator
- Posts: 5799
- Joined: Wed Nov 08, 2006 7:02 pm
- Location: Maryland, Hagerstown
- Contact:
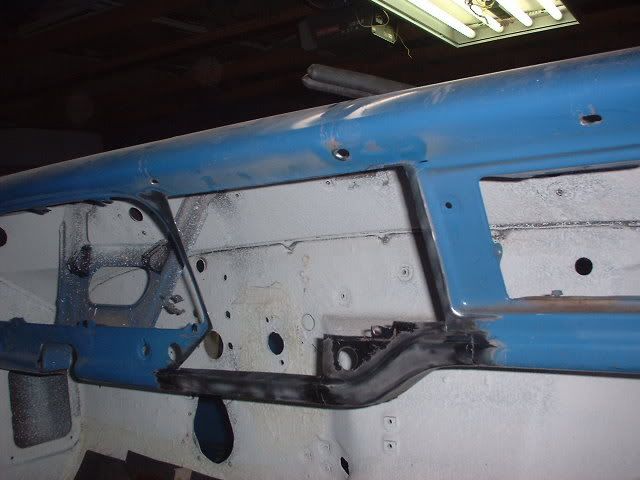
More work done. Finished painting the frame, mounted the door and finished it off and did the other doors rust repair. Put some mud on the cab corner as well. Almost had enough light left over to pick up the bed and put it back on so I can do the body work inside. Maybe tomorow...
The door back on the cab. The top crease above the door handle where the mirror mounts isn't quite as true as I'd like it. May try to block sand it true with the 2k primer.
The cab corner is all but done. I just need to blend the top of the mud into the body contour. I did find three more little dents above this corner and the biggest needs another coat to finish off.
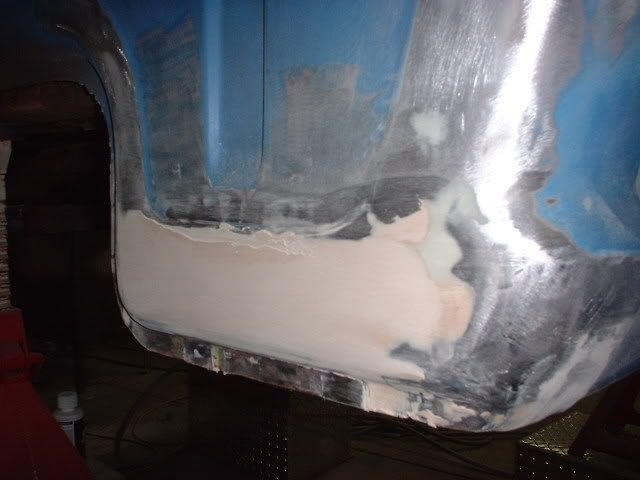
Jamie
The door back on the cab. The top crease above the door handle where the mirror mounts isn't quite as true as I'd like it. May try to block sand it true with the 2k primer.
The cab corner is all but done. I just need to blend the top of the mud into the body contour. I did find three more little dents above this corner and the biggest needs another coat to finish off.
Jamie
'70 F-350 CS Cummins 6BT 10klb truck 64k mile Bahama Blue
Contact me for CNC Dome Lamp Bezels and Ash Tray pulls.
Contact me for CNC Dome Lamp Bezels and Ash Tray pulls.
-
Ranchero50
- Moderator
- Posts: 5799
- Joined: Wed Nov 08, 2006 7:02 pm
- Location: Maryland, Hagerstown
- Contact:
The trucks been sitting waiting patiently... Been busy with the dome lamp bezels and ten thousand other aggrevating things. I 'won' a 2005 Explorer CD player and am working on grafting it into the factory dash on this thread:
http://www.fordification.com/forum/view ... hp?t=26982
I've also done a buy it now for an Ingersol Rand inline sander for $80 shipped. Sear.com wanted $120. Once that shows up I'll get back into the bodywork.
Jamie
http://www.fordification.com/forum/view ... hp?t=26982
I've also done a buy it now for an Ingersol Rand inline sander for $80 shipped. Sear.com wanted $120. Once that shows up I'll get back into the bodywork.
Jamie
'70 F-350 CS Cummins 6BT 10klb truck 64k mile Bahama Blue
Contact me for CNC Dome Lamp Bezels and Ash Tray pulls.
Contact me for CNC Dome Lamp Bezels and Ash Tray pulls.
-
Ranchero50
- Moderator
- Posts: 5799
- Joined: Wed Nov 08, 2006 7:02 pm
- Location: Maryland, Hagerstown
- Contact:
Spent some time today on the truck... Seems like after a while you just have to push all the important stuff out of the way and get back to what you 'want' to do.
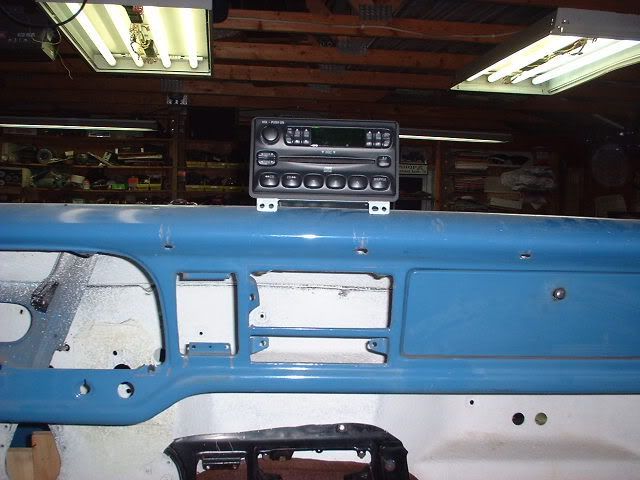
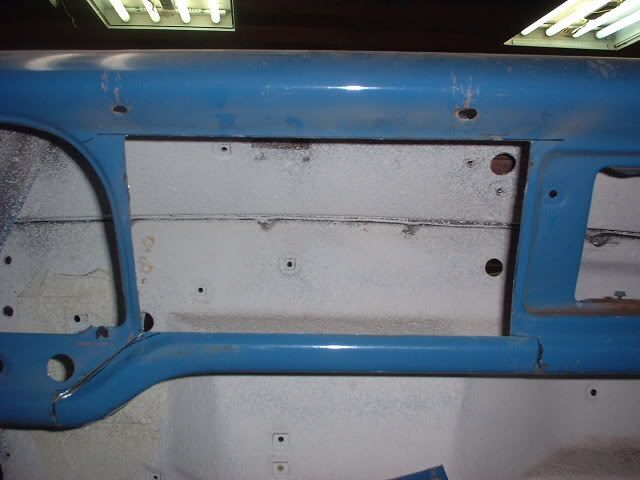
I finally installed the other cab corner and then started on the stereo install. It's a din and a half so I have to rework the center of the dash for it to fit...
Been playing with this idea some more. Ended up getting another center dash section last week to chop apart and graft into the original dash to make room for this stereo to fit. I figure I'll graft the stereo in and then whittle a factory looking bezel out of aluminum. I also found a decent AC heater control on the dash I sawzalled apart.
Photochopped... Figure I'll move the bottom sweep over under the glovebox, lower the ash tray and heater control and graft in the missing peices from the black dash. The holes above the ash tray will be for the diesel glowplug and water in fuel lamps. I'll have to fab up something in aluminum for them as well.
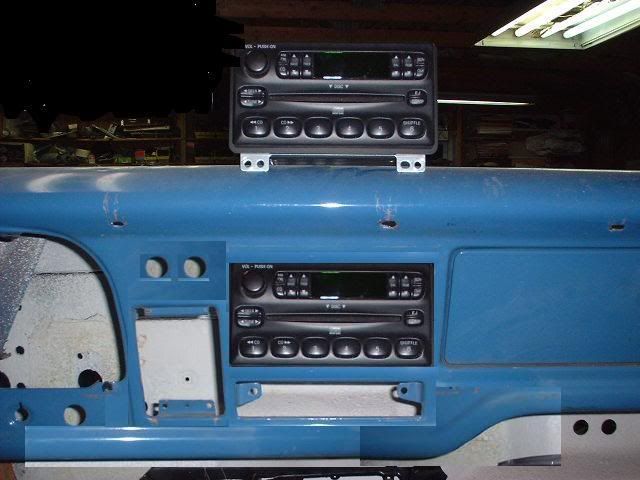
I made this picture up a while ago. Gonna be a lot of fine cutting and fitting back together but it's the direction I want to go with it. Custom. I already made a particle board blank for the stereo faceplate and it fits side to side in the original radio hole, it just needs more height. I also considered changing the heater controls out to something that would fit where the ash tray was. The guys at the junk yard couldn't fathom what I'm going to do and never heard of someone cutting a dash section out to repair a radio hole.
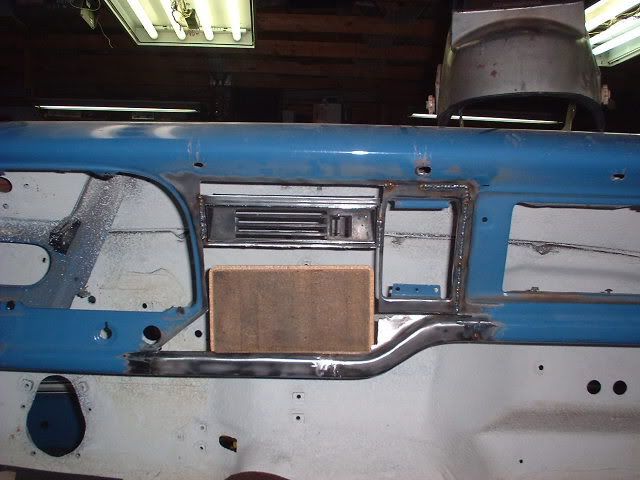
After looking at the photchopped pic and the actual parts I decided not to move the sweep all the way over under the glovebox. It just doesn't look balanced. Also the metal below the instrument cluster is vertical so the heater controls wouldn't fit correctly with the stock bezel (it's angled like the glovebox door). First off I carefully cut out the sweep section from the donar dash, then figured where I can cut the blue dash apart to remove the sweep and extra bottom.

The I used the wire wheel to clean the paint off of the parts and fit the extra bottom section to the left side of the donar's sweep and fit it into the dash. Notice I have two hazard switch holes now.
In the pic the lower dash looks bent, but it shows straight with a straight edge so who knows...
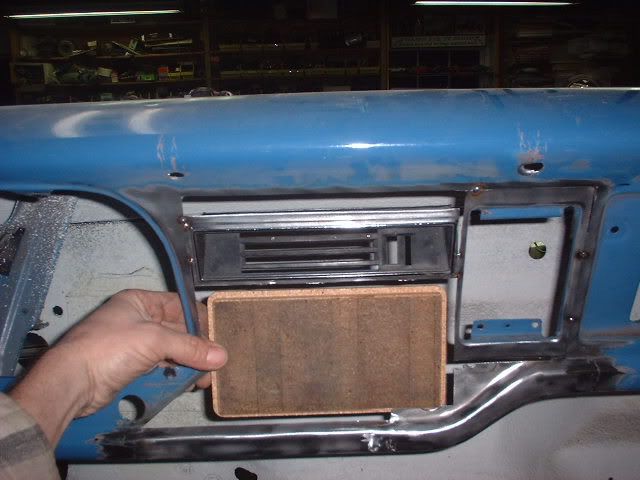
Next I cut apart the heater controls and ash tray mount, wire wheeled them and repositioned them. The wooden panel is the size of the stereo face. I'll make an aluminum bezel for it to mount in and then finish the dash metal with tabs or maybe even a factory stereo slide to hold everything solid.
I'm not overly concerned about heater clearance (I don't think it'll be a problem) because I plan on fabricating an AC / heat enclosure out of stainless since the factory stuff sucks so bad. Another thing is with so many tight bends in the parts I haven't had any warpage problems and what little is there now is pretty strong. The thin section above the heater controls may end up housing the 'wait to start' and 'water in fuel' lamps if I can find something cool to mount them in... Stand by.
Jamie
I finally installed the other cab corner and then started on the stereo install. It's a din and a half so I have to rework the center of the dash for it to fit...
Been playing with this idea some more. Ended up getting another center dash section last week to chop apart and graft into the original dash to make room for this stereo to fit. I figure I'll graft the stereo in and then whittle a factory looking bezel out of aluminum. I also found a decent AC heater control on the dash I sawzalled apart.
Photochopped... Figure I'll move the bottom sweep over under the glovebox, lower the ash tray and heater control and graft in the missing peices from the black dash. The holes above the ash tray will be for the diesel glowplug and water in fuel lamps. I'll have to fab up something in aluminum for them as well.
I made this picture up a while ago. Gonna be a lot of fine cutting and fitting back together but it's the direction I want to go with it. Custom. I already made a particle board blank for the stereo faceplate and it fits side to side in the original radio hole, it just needs more height. I also considered changing the heater controls out to something that would fit where the ash tray was. The guys at the junk yard couldn't fathom what I'm going to do and never heard of someone cutting a dash section out to repair a radio hole.
After looking at the photchopped pic and the actual parts I decided not to move the sweep all the way over under the glovebox. It just doesn't look balanced. Also the metal below the instrument cluster is vertical so the heater controls wouldn't fit correctly with the stock bezel (it's angled like the glovebox door). First off I carefully cut out the sweep section from the donar dash, then figured where I can cut the blue dash apart to remove the sweep and extra bottom.
The I used the wire wheel to clean the paint off of the parts and fit the extra bottom section to the left side of the donar's sweep and fit it into the dash. Notice I have two hazard switch holes now.
In the pic the lower dash looks bent, but it shows straight with a straight edge so who knows...
Next I cut apart the heater controls and ash tray mount, wire wheeled them and repositioned them. The wooden panel is the size of the stereo face. I'll make an aluminum bezel for it to mount in and then finish the dash metal with tabs or maybe even a factory stereo slide to hold everything solid.
I'm not overly concerned about heater clearance (I don't think it'll be a problem) because I plan on fabricating an AC / heat enclosure out of stainless since the factory stuff sucks so bad. Another thing is with so many tight bends in the parts I haven't had any warpage problems and what little is there now is pretty strong. The thin section above the heater controls may end up housing the 'wait to start' and 'water in fuel' lamps if I can find something cool to mount them in... Stand by.
Jamie
'70 F-350 CS Cummins 6BT 10klb truck 64k mile Bahama Blue
Contact me for CNC Dome Lamp Bezels and Ash Tray pulls.
Contact me for CNC Dome Lamp Bezels and Ash Tray pulls.
-
FORD428CJ

- New Member

- Posts: 158
- Joined: Mon Jun 20, 2005 11:13 am
- Location: Oregon, Klamath Falls
I wouldnt say that 10psi is pointless on a IDI. Have you took a ride in one that wasn't turboed to one that is. Turns it from a slug to a good runner. Not like a PSD or a hyped up 12V but it has some spunk to it!averagef250 wrote:with a 10 PSI limit a turbo's pretty much pointless then.
That's a far cry from the cummins train of thought: put as much pressure to it as possible!
Although intercooled, 10 psi is alot more air and might make a good difference.
You got to remember that those engines are 21.5to1 not 17 or 18to1. Makes a big difference from going NA (21.5to1) to 10psi boost on a IDI. Wakes them up big time! If you run studs in the heads then you can pull 15+psi out of them. There are guys off some of the forums that run 20+psi. But they have lowered there compression down some.
I think you have something against IDI???LOL Thats fine but they are a tuff engine and I can vouch for that. I think he will be happy with it. I know that I am.....JMHO
Wes Adams FORD428CJ
Built Ford Tuff With Good Ford Stuff
79 F-250 X-Cab 4x4 6.9 Turbo Diesel
64 Falcon X-Ram 428
55 FORD Truck 4-link Rides on air with X-Ram 428
67 Stang 351 C/J
2000 Yamaha V-MAX VMOA#4277
Built Ford Tuff With Good Ford Stuff
79 F-250 X-Cab 4x4 6.9 Turbo Diesel
64 Falcon X-Ram 428
55 FORD Truck 4-link Rides on air with X-Ram 428
67 Stang 351 C/J
2000 Yamaha V-MAX VMOA#4277
-
Ranchero50
- Moderator
- Posts: 5799
- Joined: Wed Nov 08, 2006 7:02 pm
- Location: Maryland, Hagerstown
- Contact:
Wes, I actually like the big slugs. The '89 F450 wrecker I resurected has an ATS kit on with custom pipes and runs really good for a worn out motor. It runs much stronger than the '84 C3500 crew cab rollback I built. I like the 6.9's better than the 7.3's, seem to run harder.
My goal is to find a GM blower and fab up a custom intake and blow some air into the motor via the gear drive (custom pump mount with another cam gear above to dirve the blower.)
I've been working on the truck for a couple hours each week getting the dash panel tuned in for the radio and it's turned out pretty decent.
Jamie
'70 F-350 CS Cummins 6BT 10klb truck 64k mile Bahama Blue
Contact me for CNC Dome Lamp Bezels and Ash Tray pulls.
Contact me for CNC Dome Lamp Bezels and Ash Tray pulls.
-
FORD428CJ
- New Member
- Posts: 158
- Joined: Mon Jun 20, 2005 11:13 am
- Location: Oregon, Klamath Falls
WOW Jamie!!! I would like to see a Huffer on it. That would be cool. I'm like you, "I actually like the big slugs". Great project you are working on and thanks for the updates!!!!!Ranchero50 wrote:Wes, I actually like the big slugs. The '89 F450 wrecker I resurected has an ATS kit on with custom pipes and runs really good for a worn out motor. It runs much stronger than the '84 C3500 crew cab rollback I built. I like the 6.9's better than the 7.3's, seem to run harder.
My goal is to find a GM blower and fab up a custom intake and blow some air into the motor via the gear drive (custom pump mount with another cam gear above to dirve the blower.)
I've been working on the truck for a couple hours each week getting the dash panel tuned in for the radio and it's turned out pretty decent.
Jamie
Wes Adams FORD428CJ
Built Ford Tuff With Good Ford Stuff
79 F-250 X-Cab 4x4 6.9 Turbo Diesel
64 Falcon X-Ram 428
55 FORD Truck 4-link Rides on air with X-Ram 428
67 Stang 351 C/J
2000 Yamaha V-MAX VMOA#4277
Built Ford Tuff With Good Ford Stuff
79 F-250 X-Cab 4x4 6.9 Turbo Diesel
64 Falcon X-Ram 428
55 FORD Truck 4-link Rides on air with X-Ram 428
67 Stang 351 C/J
2000 Yamaha V-MAX VMOA#4277
-
Ranchero50
- Moderator
- Posts: 5799
- Joined: Wed Nov 08, 2006 7:02 pm
- Location: Maryland, Hagerstown
- Contact:
Update time again. I screwed up the bondo work on the dash (bondo'd over some painted surface) Bad poop, it all had to come back off and be redone... I did get the engine fired up again after replacing the return line stuff so it wouldn't leak anymore. I'm getting antsy and the mill is going to be showing up in a couple weeks so it needs to get back together. The dome lamp bezel project has really taken off so I've only gotten a couple hours each weekend to work on the truck. PITA
Jamie
Jamie
'70 F-350 CS Cummins 6BT 10klb truck 64k mile Bahama Blue
Contact me for CNC Dome Lamp Bezels and Ash Tray pulls.
Contact me for CNC Dome Lamp Bezels and Ash Tray pulls.
-
rbohm

- New Member
- Posts: 1
- Joined: Mon Jan 07, 2008 2:53 am
- Location: tucson,az/luray,va
- Contact:
re: '71 F-250 Diesel conversion and more (1/29 updatel)
1: replace the oil cooler "O" rings now while things are apart and they are easy to do.
2: dump the mechanical lift pump, and go with an electric pump. that way when you replace the fuel filter later on you cont have to crank the engine to get the filter filled.
one more thing, replace the stock 6.9 glow plug controller with one from a 7.3. they interchange and the 7.3 controller is far more reliable.
64 falcon
66 falcon
66 mustang
my mind is aglowwith whirling transient nodes of thought
careening through a cosmic vapor of invention
66 falcon
66 mustang
my mind is aglowwith whirling transient nodes of thought
careening through a cosmic vapor of invention
-
FORD428CJ
- New Member
- Posts: 158
- Joined: Mon Jun 20, 2005 11:13 am
- Location: Oregon, Klamath Falls
Re: re: '71 F-250 Diesel conversion and more (1/29 updatel)
Push start button works the best. I would eliminate the controller all together. That is one more thing to go wrong.rbohm wrote:
one more thing, replace the stock 6.9 glow plug controller with one from a 7.3. they interchange and the 7.3 controller is far more reliable.
If you do a push button controller LOL. You may want to use some good glow plugs, like Bosch Duraterm. I tried A/C GP and they didn't last 2 weeks! JMHO
Wes Adams FORD428CJ
Built Ford Tuff With Good Ford Stuff
79 F-250 X-Cab 4x4 6.9 Turbo Diesel
64 Falcon X-Ram 428
55 FORD Truck 4-link Rides on air with X-Ram 428
67 Stang 351 C/J
2000 Yamaha V-MAX VMOA#4277
Built Ford Tuff With Good Ford Stuff
79 F-250 X-Cab 4x4 6.9 Turbo Diesel
64 Falcon X-Ram 428
55 FORD Truck 4-link Rides on air with X-Ram 428
67 Stang 351 C/J
2000 Yamaha V-MAX VMOA#4277
-
Ranchero50
- Moderator
- Posts: 5799
- Joined: Wed Nov 08, 2006 7:02 pm
- Location: Maryland, Hagerstown
- Contact:
Thanks for the comments guys, I tried starting it tonight after sitting for a week and it fired off immediately, like half a rotation of the crank. Guess the O-ring kit was worth every penny. The engine has the newer wiring harness and glowplug controller heating a set of Beru glowplugs.
Pretty cool with the motor bolted into the frame with the bed just sitting there. The batteries are hanging off the frame horns on C clamps and a jumper cable is running up to the glowplug controller source and another jumper is going to the injector pump 12v.
I may put a pushbutton to ground the negative side of the solenoid like the controller does for the glowplugs, but the controller worked great. One bad thing is I managed to twist the old controller off half in the block. Figure it's a leak waiting to happen.
I also spent an hour tonight using toulene to clean the excess seam sealer off the cab. PITA...
Jamie
'70 F-350 CS Cummins 6BT 10klb truck 64k mile Bahama Blue
Contact me for CNC Dome Lamp Bezels and Ash Tray pulls.
Contact me for CNC Dome Lamp Bezels and Ash Tray pulls.